PIR alarm sensor
Material
Hardware
- Arduino Uno
- hellothing NB-IoT shield
- Arduino PIR sensor
Steps process
Step 1:
Assemble the hardware
Connect the shield to the Arduino.
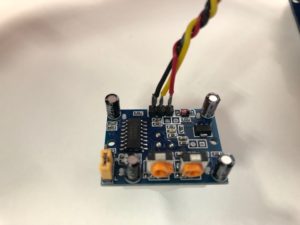
The PIR sensor works with 5V. Wire the PIR sensor to the shield by connecting the pin on the right(RED) to 5V, the pin on the left(BLACK) to GND and the pin in the middle(YELLOW) to pin 2 of the Arduino.
Step 2:
Add sketch definitions
Add the code below to the top of the Arduino sketch.
Include the hellothing_BG96_NBIoT library.
Define the constant variables.
Add the function prototypes for the interrupt service, the sensor reading and the connection with the platform.
Create an instance of the communication layer.
Define all the global variables.
Step 3:
Setup the pins
The code is added to the setup() function of the sketch.
The code below sets up all of the pins in the right configuration.
The analog reference is set to the external reference for the temperature sensor.
The modem pins is set to enable the power and serial communication.
The PIR pin(2) is set up as an input and an interrupt is attached to the pin to detect when the sensor picks up movement.
Step 4:
Setup the modem
The code is added to the setup() function of the sketch.
Start the debug serial port on the defined baud rate.
Power up the modem.
Initialise the modem and specify the network parameters.
Get the device IMEI, IMSI and ICCID and send it to the platform.
Step 5:
Add sensorValue function
The function reads the temperature and the state of the PIR sensor and sends it to the platform.
Step 6:
Add sendMessage function
The function creates the TCP/IP connection to the platform.
It sends either the device IDs or the signal and sensor details.
After sending the data the connection is closed.
Step 7:
Add interrupt service
The interrupt service sets the variable to true whenever the PIR detects movement.
Step 8:
Add the main loop
The main loop is idle until the timer expires or the interrupt is triggered.
The timer resets whenever data is send to the platform.
